| N/A | N/A | N/A | ||||
| N/A | N/A | N/A | ||||
| N/A | ||||||
| N/A | N/A | N/A | ||||
| N/A | N/A | |||||
| N/A | ||||||
| File:Dragonfire shield (uncharged).png Dragonfire Shield | N/A | N/A | ||||
| N/A | N/A | N/A | N/A | N/A | ||
| N/A | ||||||
| N/A | N/A | |||||
No edit summary |
No edit summary |
||
| (6 intermediate revisions by 2 users not shown) | |||
| Line 1: | Line 1: | ||
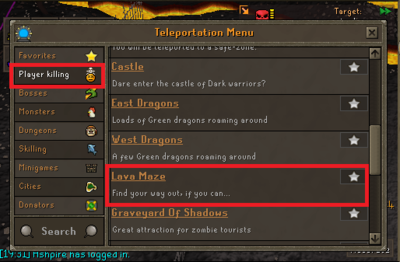
[[File:Teleport3234.png|right|thumb|400px|<center>How to get there</center>]] | [[File:Teleport3234.png|right|thumb|400px|<center>How to get there</center>]] | ||
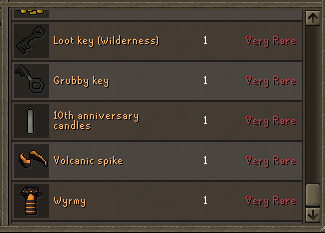
[[File:Wildywyrm drops.png|right|thumb|400px|<center>WildyWyrm drops</center>]] | [[File:Wildywyrm drops.png|right|thumb|400px|<center>WildyWyrm drops</center>]] | ||
=== Introduction === | === Introduction === | ||
The Wildywyrm boss is located in 40 | The Wildywyrm boss is located in 40 wilderness and has multi-combat way zones surrounding the area. Along with smaller wildywyrms, You will have to be alert of PKers that will hunt you down for an easy kill. The boss is relatively difficult to fight alone, So bringing a friend is advised, Not only to help kill the boss, But to scare away any solo players looking to kill you. This boss drops the best food in the game, Being "Fury Sharks" so bringing a looting bag to pickup some of the drops while not taking up your inventory space is advised. You can also use the Fury Shark drops as replenishment on any food you might be using for the fight as it drops them cooked which makes it nice to stay for longer trips. | ||
=== Recommended Gear === | === Recommended Gear === | ||
| Line 13: | Line 12: | ||
{| class="wikitable sticky-header" style=text-align:center; | {| class="wikitable sticky-header" style=text-align:center; | ||
! <center>Slot</center> !! colspan="5"|<center> | ! <center>Slot</center> !! colspan="5"|<center>Recommended Melee Setup</center> | ||
|- | |- | ||
|[[File:Head slot.png|center]] || [[File: | |[[File:Head slot.png|center]] || [[File:Serpentine helm.png]] Serpentine helm or [[File:Helm of neitiznot.png]] Helm of Neitiznot || [[File:Warrior_helm.png]] Warriors Helm || {{NA}} || {{NA}} || {{NA}} | ||
|- | |- | ||
|[[File:Neck slot.png|center]] | |[[File:Neck slot.png|center]] || [[File:Amulet of fury.png]] Amulet of fury || [[File:Amulet_of_gloryxx.png]] Amulet of glory || {{NA}} || {{NA}} || {{NA}} | ||
|- | |- | ||
|[[File:Cape slot.png|center]] || [[File:Completionist_cape.png]] (Slaughter/Master) Completionists cape || [[File:Tokhaar-kal.png]] Tokhaar-kal || [[File:Fire cape.png]] Fire cape || [[File:Max cape.png]] Max cape || {{NA}} | |[[File:Cape slot.png|center]] || [[File:Completionist_cape.png]] (Slaughter/Master) Completionists cape || [[File:Tokhaar-kal.png]] Tokhaar-kal || [[File:Fire cape.png]] Fire cape || [[File:Max cape.png]] Max cape || {{NA}} | ||
|- | |- | ||
|[[File:Body slot.png|center]] || [[File: | |[[File:Body slot.png|center]] || [[File:Karil's_leathertop.png]] Karil's Leathertop || [[File:Blessed body.gif]] Blessed body or [[File:Black d'hide body.png]] Black d'hide body || {{NA}} || {{NA}} || {{NA}} | ||
|- | |- | ||
|[[File:Legs slot.png|center]] || [[File: | |[[File:Legs slot.png|center]] || [[File:Dharok's platelegs.png]] Dharok's platelegs (or Barrows platelegs) || [[File:Karil's leatherskirt.png]] Karil's leatherskirt || [[File:Blessed chaps.gif]] Blessed chaps or [[File:Black d'hide chaps.png]] Black d'hide chaps || {{NA}} || {{NA}} | ||
|- | |- | ||
|[[File:Weapon slot.png|center]] || [[File:Sword Of Turmoil.png]] Sword Of Turmoil || [[File:Chaotic_rapier.png]] Chaotic | |[[File:Weapon slot.png|center]] || [[File:Sword Of Turmoil.png]] Sword Of Turmoil|| [[File:Chaotic_rapier.png]] Chaotic Rapier || [[File:Blade_of_saeldor.png]] Blade of Saeldor ||[[File:Abyssal_whip.png]] Abyssal whip || {{NA}} || | ||
|- | |||
|[[File:Shield slot.png|center]] || [[File:Avernic_defender.png]] Avernic Defender || [[File:Dragon_defender.png]] Dragon Defender || [[File:Dragonfire shield (uncharged).png]] Dragonfire Shield || {{NA}} || {{NA}} | |||
|- | |- | ||
|- | |- | ||
|[[File:Ammo slot.png|center]] || {{NA}} || {{NA}} || {{NA}} || {{NA}} || {{NA}} | |[[File:Ammo slot.png|center]] || {{NA}} || {{NA}} || {{NA}} || {{NA}} || {{NA}} | ||
| Line 33: | Line 33: | ||
|[[File:Hands slot.png|center]] || [[File:Ferocious gloves.png]] Ferocious gloves || [[File:Goliath gloves (black).png]] Goliath gloves || [[File:Barrows gloves.png]] Barrows gloves || [[File:Dragon gloves.png]] Dragon gloves || [[File: Rune gloves.png]] Rune gloves | |[[File:Hands slot.png|center]] || [[File:Ferocious gloves.png]] Ferocious gloves || [[File:Goliath gloves (black).png]] Goliath gloves || [[File:Barrows gloves.png]] Barrows gloves || [[File:Dragon gloves.png]] Dragon gloves || [[File: Rune gloves.png]] Rune gloves | ||
|- | |- | ||
|[[File:Feet slot.png|center]] || [[File:Primordial_boots.png]] Primordial boots || [[File:Dragon_boots.png]] Dragon boots|| [[File:Bandos boots.png]] Bandos boots || [[File:Rock_climbing_boots.png]] Rock climbing boots | |[[File:Feet slot.png|center]] || [[File:Primordial_boots.png]] Primordial boots || [[File:Dragon_boots.png]] Dragon boots|| [[File:Bandos boots.png]] Bandos boots || [[File:Rock_climbing_boots.png]] Rock climbing boots || {{NA}} | ||
|- | |- | ||
|[[File:Ring slot.png|center]] || [[File:Berserker ring (i).png]] Berserker ring (i) || [[File:Ring_of_suffering_(i).png]] Ring of Suffering (i) || [[File:Berserker ring.png]] Berserker ring || [[File:Ring of wealth.png]] Ring of wealth (i) || [[File:Ring of wealth.png]] Ring of wealth | |[[File:Ring slot.png|center]] || [[File:Berserker ring (i).png]] Berserker ring (i) || [[File:Ring_of_suffering_(i).png]] Ring of Suffering (i) || [[File:Berserker ring.png]] Berserker ring || [[File:Ring of wealth.png]] Ring of wealth (i) || [[File:Ring of wealth.png]] Ring of wealth | ||
|- | |- | ||
|[[File:Special attack orb.png]] || [[File:Bandos_godsword.png]] Bandos Godsword || | |[[File:Special attack orb.png]] || [[File:Bandos_godsword.png]] Bandos Godsword || [[File:Dragon_claws.png]] Dragon Claws || [[File:Dragon_dagger.png]] Dragon Dagger || {{NA}} || {{NA}} || | ||
[[File:Dragon_claws.png]] Dragon Claws || [[File:Dragon_dagger.png]] Dragon Dagger || {{NA}} | |||
| | |||
|} | |} | ||
| Line 46: | Line 44: | ||
=== The Fight === | === The Fight === | ||
The fight is surprisingly relatively straightforward given how hard the boss is to actually kill. You use soulsplit and turmoil and attack the boss. There is no mechanics or things to dodge, Just a straight out DPS fight. The boss will occasionally shoot a fireball at you that does heavy damage and it hits with its melee attack very consistently, So make sure you are potted and have soulsplit going to regain some of your health back. The boss also has a special attack that essentially calls for the other wildywyrms to attack you with their special abilities so watch out for unsuspected stacked damage from the wyrms around the area. | The fight is surprisingly relatively straightforward given how hard the boss is to actually kill. You use soulsplit and turmoil and attack the boss. There is no mechanics or things to dodge, Just a straight out DPS fight. The boss will occasionally shoot a fireball at you that does heavy damage and it hits with its melee attack very consistently, So make sure you are potted and have soulsplit going to regain some of your health back. The boss also has a special attack that essentially calls for the other wildywyrms to attack you with their special abilities so watch out for unsuspected stacked damage from the wyrms around the area. | ||
[[File:Wyrm.png|left|thumb|400px|<center>Fighting the Wildywyrm</center>]] | |||
Latest revision as of 00:32, 31 January 2024


Introduction[edit | edit source]
The Wildywyrm boss is located in 40 wilderness and has multi-combat way zones surrounding the area. Along with smaller wildywyrms, You will have to be alert of PKers that will hunt you down for an easy kill. The boss is relatively difficult to fight alone, So bringing a friend is advised, Not only to help kill the boss, But to scare away any solo players looking to kill you. This boss drops the best food in the game, Being "Fury Sharks" so bringing a looting bag to pickup some of the drops while not taking up your inventory space is advised. You can also use the Fury Shark drops as replenishment on any food you might be using for the fight as it drops them cooked which makes it nice to stay for longer trips.
Recommended Gear[edit | edit source]
I would definitely recommend only doing this boss if you have a steel titan. Although it is definitely possible to do without one, The Wildywyrm has a lot of HP and the titan also will tank a lot of the damage for you to save your supplies. Also a "Sword of Turmoil" Would be the best weapon to use against the Wildywyrm. Being the best melee combat weapon to use in the wilderness, It will allow you to hit 70+ with the increased damage it provides. You can get the sword of turmoil from revenants as a rare drop and it uses ether as it's ammunition.
The Fight[edit | edit source]
The fight is surprisingly relatively straightforward given how hard the boss is to actually kill. You use soulsplit and turmoil and attack the boss. There is no mechanics or things to dodge, Just a straight out DPS fight. The boss will occasionally shoot a fireball at you that does heavy damage and it hits with its melee attack very consistently, So make sure you are potted and have soulsplit going to regain some of your health back. The boss also has a special attack that essentially calls for the other wildywyrms to attack you with their special abilities so watch out for unsuspected stacked damage from the wyrms around the area.


