| N/A | N/A | |||||
| File:Capes of accomplishments (trimmed).gif Cape of accomplishment | ||||||
| N/A | N/A | N/A | N/A | N/A | ||
No edit summary |
No edit summary |
||
| Line 37: | Line 37: | ||
|- | |- | ||
|} | |} | ||
|-| | |||
Magic Method= | |||
{| class="wikitable sticky-header" style=text-align:center; | |||
! <center>Slot</center> !! colspan="5"|<center>Item (most effective → least effective) </center> | |||
|- | |||
|[[File:Head slot.png|center]] || [[File:Virtus mask.png]] Virtus mask || [[File:Zuriel's hood.png]] Zuriel's hood || [[File:Ahrim's hood.png]] Ahrim's hood || [[File:Serpentine helm.png]] Serpentine helm || [[File:Helm of neitiznot.png]] Helm of Neitiznot | |||
|- | |||
|[[File:Neck slot.png|center]] || [[File:Arcane stream necklace.png]] Arcane stream necklace || [[File:Occult necklace.png]] Occult necklace || [[File:Amulet of fury.png]] Amulet of fury || [[File:Amulet of glory.png]] Amulet of glory | |||
|- | |||
|[[File:Cape slot.png|center]] || [[File:Imbued god capes.gif]] || [[File:Slaughter completionist cape.png]] Slaughter completionist cape || [[File:Completionist cape.png]] Completionist cape || [[File:Slaughter master cape.png]] Slaughter master cape || [[File:Max cape]] Max cape or [[File:Capes of accomplishments (trimmed).gif]] | |||
|- | |||
|[[File:Body slot.png|center]] || [[File:Virtus robe top.png]] Virtus body || [[File:Ancestral robe top.png]] Ancestral robe top || [[File:Zuriel's robe top.png]] Zuriel's robe top || [[File:Ahrim's robetop.png]] Ahrim's robetop || [[File:Mystic robe top.png]] Mystic robe top | |||
|- | |||
|[[File:Legs slot.png|center]] || [[File:Virtus robe legs.png]] Virtus robe legs|| [[File:Ancestral robe bottom.png]] Ancestral robe bottom || [[File:Zuriel's robe bottom.png]] Zuriel's robe bottom || [[File:Ahrim's robeskirt.png]] || [[File:Mystic robe bottom.png]] Mystic robe bottom | |||
|- | |||
|[[File:Weapon slot.png|center]] || {{Colour|#ff5e5e|UPGRADED VERSION}}[[File:Tumeken's shadow (uncharged).png]] Tumuken's Shadow || [[File:Tumeken's shadow (uncharged).png]] Tumuken's Shadow || [[File:Kodai wand.png]] Kodai wand || [[File:Chaotic staff.png]] Chaotic staff || [[File:Zuriel's staff.png]] Zuriel's staf || [[File:Toxic staff of the dead.png]] Toxic staff of the dead || [[File:Nightmare staff.png]] Eldritch/Harmonised Nightmare Staff or [[File:Ahrim's staff.png]] Ahrim's staff | |||
|- | |||
|[[File:Shield slot.png|center]] || [[File:Arcane spirit shield.png]] Arcane spirit shield || [[File:Farseer kiteshield.png]] Farseer kiteshield || [[File:Ancient wyvern shield.png]] Ancient wyvern shield || [[File:Malediction ward.png]] Malediction ward ||[[File:Mage's book.png]] Mage's book | |||
|- | |||
|[[File:Ammo slot.png|center]] || {{NA}} || {{NA}} || {{NA}} || {{NA}} || {{NA}} | |||
|- | |||
|[[File:Hands slot.png|center]] || [[File:Tormented bracelet.png]] Tormented bracelet || [[File:Virtus gloves.png]] Virtus gloves || [[File:Barrows gloves.png]] Barrows gloves || [[File:Infinity gloves.png]] Infinity gloves || [[File:Mystic gloves.png]] Mystic gloves | |||
|- | |||
|[[File:Feet slot.png|center]] || [[File:Virtus boots.png]] Virtus boots || [[File:Eternal boots.png]] Eternal boots ||[[File:Devout boots.png]] Devout boots || [[File:Infinity boots.png]] Infinity boots || [[File:Wizard boots.png]] Wizard boots | |||
|- | |||
|[[File:Ring slot.png|center]] || [[File:Seers ring (i).png]] Seers ring (i) || [[File:Seers ring.png]] Seers ring || [[File:Ring of wealth (i).png]] Ring of wealth (i) || [[File:Ring of wealth.png]] Ring of wealth || {{NA}} | |||
|- | |||
|} | |||
</tabber> | |||
</tabber> | </tabber> | ||
Revision as of 16:45, 30 December 2023


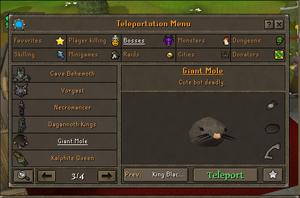
The Giant Mole Is a popular boss for people to grind for the Mole Pet Drop. Taking almost no damage, it's incredibly easy to kill. The only downside is currently the Giant Mole is in a singles area. If it becomes a multi area, You SHOULD be able to use your familiar to find where the Mole digs to when its Health is low.
The only real mechanics the giant mole has is basic melee attacks you can mostly ignore. When he is 50% HP or lower, he will dig to a random part of the cave and you will have to find him. A good way of killing him is to use a poison / venom weapon so while it takes you a bit to find him he is continuing to die (Poison damage won't trigger him to dig again) Like stated above, If the cave is made into a multi combat area, You should be able to use your familiar to find him when he digs as he will walk to where the direction of the mole has gone.
Bring your best melee gear and a stamina potion or 10.
| File:Max cape Max cape or File:Capes of accomplishments (trimmed).gif | |||||||
| UPGRADED VERSION |
|||||||
| N/A | N/A | N/A | N/A | N/A | |||
| N/A | |||||||
</tabber>


